During these stay-at-home days, I thought I would have some extra time to work on my computer vision projects. But instead, I spent most of my evenings trying to figure out how to let others leave comments on my blog. It turns out to be a pretty interesting project as I was exposed to the world of Amazon Web Services.
Anyone who has tried to add comments to her static website would know that it is no trivial task. A static website is essentially a bunch of HTML documents hosted somewhere (in my case a GitHub repo). Some limited user interactions are possible through client-side scripting, e.g. everytime the page is refreshed, use a different color scheme. But there is no direct way to make persistent changes to the web content through user interaction, e.g. submitting a form to change a record.
After some research, I decided to go with the serverless approach to implement a comment system on my blog. The term “serverless” is actually quite misleading, because there is still a server. It is just that we don’t have to maintain it. Instead a cloud service provider will do all the hard work for us. In my case, I have decided to choose AWS as my serverless service provider. The architecture of the comment system is shown below.

There are mainly 3 components in this architecture.
- Jekyll, which turn the files in my GitHub repo to static web content.
- GitHub REST API, which creates a YAML file in the repo for each new comment submitted.
- Amazon API Gateway and AWS Lambda, which acts as the server backend.
When an user submits a comment on a blog post, the followings would happen:
- A POST request with the comment as the payload is sent to an API endpoint on Amazon API Gateway.
- The API endpoint invokes an AWS Lambda function.
- The Lambda function sends a PUT request to the GitHub REST API in order to create a new comment file in the repo.
- Jekyll parses the new comment file and renders it at the bottom of the originating post.
I am going to walk through the set up of each component. However, I believe you can easily replace any of the components and design your own comment system. For example, you may want to use Microsoft Azure instead of AWS Lambda, or create your own HTML documents instead of using a static stie generator like Jekyll.
1. Jekyll
As GitHub Pages are powered by Jekyll, I assume that if you are hosting your blog (or your small business website, your project page, etc) on a GitHub Page, you are already using Jekyll. If you are not using Jekyll yet, I do recommend giving it a try. It may take a bit of time to set up, but in a long run it makes maintainence much easier.
For the rest of this section, I am going to assume that you already know how to use Jekyll. If not, you may checkout out their step-by-step tutorial, it will probably take about 30 minute to get your first Jekyll site up and running.
You can also check out a bare-bones version of my Jekyll site at this GitHub repo.
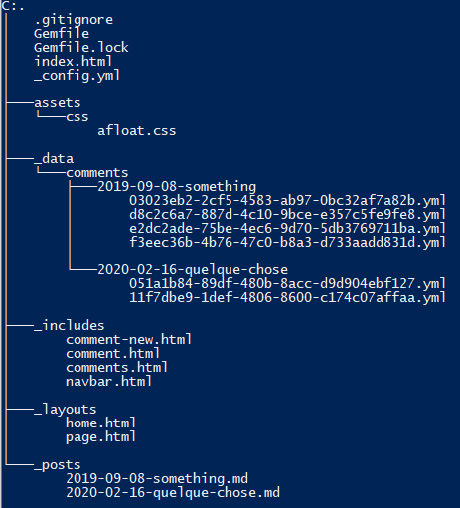
Jekyll is essentially a parser, one of its features is that it can parse a data file written in YAML (or JSON, CSV) and use it to create the static web content. Note that all the data files must be inside the directory _data. In my setup (which I learnt here), each comment is stored as one YAML file, and they are organized according to the post they are refering to. The directory structure is shown below:

The following code will process each comment file and render it accordingly.
<!-- This is comments.html-->

{% capture post_directory %}{{ (page.date | date: "%Y-%m-%d" )|append: '-'|append: page.shortname }}{% endcapture %}

<!--Find all files in /_data/{post_directory} and store them in array comments-->
{% assign comments_map = site.data.comments[post_directory] %}
{% assign comments = site.emptyArray %}
{% for comment in comments_map %}
  {% assign comments = comments | push: comment[1] %}
{% endfor %}

<div class="container">
<hr>
<h2>Comments</h2>
<ol>
  {% assign sorted_comments = comments | sort: 'date' %}
  {% for comment in sorted_comments %}
    <!--Render each comment-->
	{% include comment.html %}
	<hr>
  {% endfor %}
</ol>
<hr>
{% include comment-new.html %}
</div>
For the above code to work properly, you will have to add the following line in your _config.yml file:
emptyArray: []
You can then put comments.html at the end of your post.
<head>
  <meta name="viewport" content="width=device-width, initial-scale=1">
  <meta charset="UTF-8">
</head>
<html>
  <body>
    Some content ...
    {%- include comments.html -%}
  </body>
</html>
So far we have ocovered how to store and render the comments. Next, we will set up a form for the users to leave new comments. When they submit the form, a POST request with the comment (and may be other info you want to collect) as the payload will be sent to an API endpoint on Amazon API Gateway.
The following code will set up such a form:
{% capture comment_date %}{{ site.time }}{% endcapture %}

{% capture post_date %}{{ page.date | date: "%Y-%m-%d" }}{% endcapture %}
{% capture comment_directory %}{{ post_date|append: '-'|append: page.shortname }}{% endcapture %}

<form action="https://your-api-endpoint-on-amazon-api-gateway" method="post">
  <label for="name">Name:</label>
  <input type="text" id="name" name="name" value="" required><br><br>

  <label for="comment">Comment:</label><br>
  <textarea id="comment" name="comment" value="" rows="4" cols="50" required></textarea><br><br>

  <input type="hidden" name="comment_directory" value="{{comment_directory}}" />
  <input type="hidden" name="date" value="{{comment_date}}" />

  <input type="submit" value="Submit">
</form>
In the section after next, we will discuss how to set up your API endpoint on Amazon API Gateway, as well as create an AWS Lambda function that will send a PUT request to the GitHub API in order to create a new comment file.
2. GitHub REST API
The GitHub REST API allows you to read and manipulate your GitHub repos through HTTP endpoints. For our purpose, we just need to create a file in the repo. The documentation of how to do that is here. The followings show you the different part of the HTTP request (in Python3):
The HTTP endpoint would be something like this:
url = f"https://api.github.com/repos/{your-github-username}/{your-github-repo}/contents/{path}"
If you are using the same directory setup as I did, then path is:
path = f"_data/comments/{comment_directory}/{new_id}.yml"
The payload is something like this:
{
  "message": f"{a-commit-message}"
  "content": f"{the-comment-file-encoded-in-base64}"
}
Both message and content are required. content is the YAML comment file that you are trying to create. It should be encoded in Base64.
Also, you will have to put your personal access token in the header for authentication purpose:
{
  "authorization": f"{your-personal-access-token}"
}
All these should be sent to the GitHub API as a PUT request. In the next section, you will see how the PUT request is assembled in the Lambda function.
3. Amazon API Gateway and AWS Lambda
3.a Set Up the REST API
Amazon API Gateway let us create APIs that access various Amazon Web Service. In our case, we just want to set up a simple REST API that invokes an AWS Lambda function. Creating a REST API with Lambda integration is extremely simple, just follow this 5-step guideline (Actually we just need the first three steps, but I think it is good to go through all five.)
Once you have a basic idea of how to set up a REST API and link it to an AWS Lambda function, you can set one up for your comment system. There are two things to pay attention to:
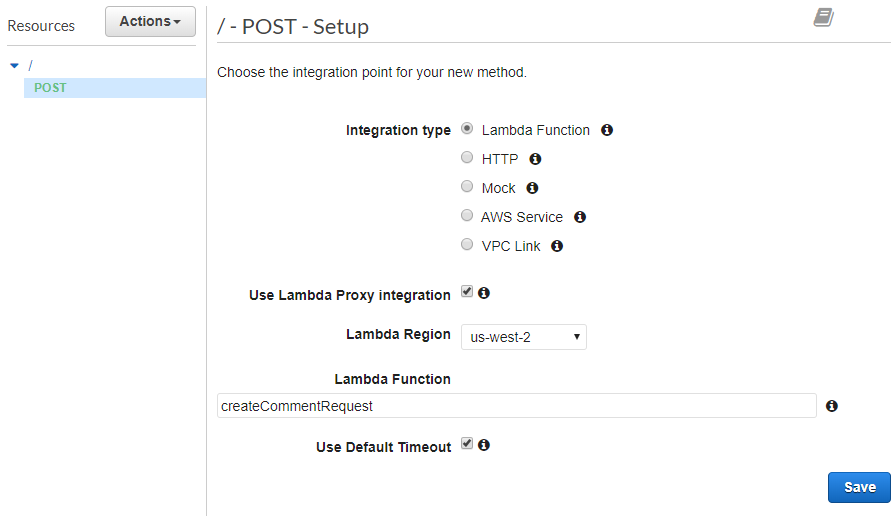
First, when you create the method (for invoking your comment-creating Lambda function) in your API, choose POST or ANY. Both of them would work. Second, check the “Use Lambda Proxy integration” checkbox as shown below.

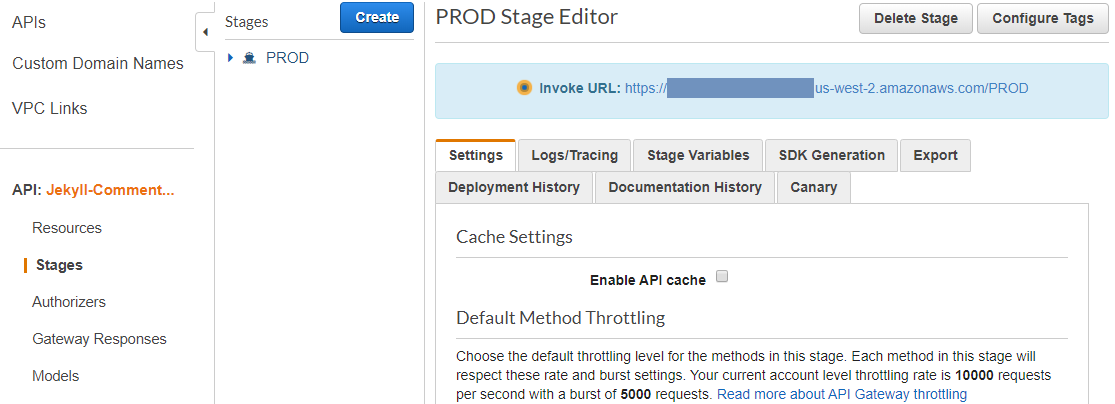
Third, the API endpoint can be find under Stages. It is the invoke URL. Once you put it in your comment form, it will invoke the Lambda function every time the form is submitted.

3b. Create the Lambda Function
The code of the Lambda function in my setup is shown below. It is pretty straight forward. There are a couple of points that may worth a little bit more elaboration.
- When the Lambda function is invoked by a POST method, the payload is in the input parameter event["body"]. You can retrieve your form data accordlingly.
- The Lambda function will return a response to the POST method, and the POST method will return it as a HTTP response. I have set the response's status code to 301, and the location to the url of the originating post. It is my attempt to implement the PR part of the POST-REDIRCT-GET pattern.
import json

import base64
import uuid

import urllib.request as urlRequest
import urllib.error
from urllib.parse import unquote

def lambda_handler(event, context):

    #the url of the originating post
    post_url = event["headers"]["referer"]

    #parse input
    params = event["body"]
    param_list = params.split('&')

    name_val_pairs = {}
    for p in param_list:
        s = p.split('=')
        if len(s) == 2:
            name_val_pairs[s[0]] = s[1]

    query_names = ["name", "comment", "date", "comment_directory"]
    for p in query_names:
        if (p not in  name_val_pairs):
            #just go back to the post if a field is missing
            return {
                'statusCode': 301,
                "headers": { "location": f"{post_url}"}
            }

    name = name_val_pairs["name"]
    comment = name_val_pairs["comment"]
    date = name_val_pairs["date"]
    comment_directory = name_val_pairs["comment_directory"]

    #create the comment file
    new_id = str(uuid.uuid4()) #create an unique id for file name
    data_str = f"id: {new_id}\nname: {name}\ndate: {date}\nmessage: {comment}\n"
    data_str = unquote(data_str.replace("+"," "))
    data = {"message": "A new comment", "content": str(base64.b64encode(bytes(data_str, 'utf-8')), 'utf-8')}
    data = json.dumps(data).encode("utf-8")

    #create url request
    url = f"https://api.github.com/repos/{your-github-username}/{your-github-repo}/contents/_data/comments/{comment_directory}/{new_id}.yml"
    headers = {'content-type':'application/json', 'authorization': f"{your-personal-access-token}"}

    req = urllib.request.Request(url, data = data, headers = headers, method = "PUT")

    try:
        resp = urlRequest.urlopen(req)

    except urllib.error.URLError as e:
        print(e.reason)

    #go back to the post
    return {
            'statusCode': 301,
            'headers': { 'location': f"{post_url}"}
        }
And this is everything you need to set up a comment system for your GitHub Page.
References
I learnt from the following posts and websites when creating this project:
- WordPress to Jekyll part 2 - Comments & commenting
- Using GitHub as a Flat Data Store and AWS Lambda to Update it
- How Jekyll Works
- GitHub Developer REST API v3 Overview
- Amazon API Gateway FAQs
Comments
Angel Vera August 14th, 2020
TakManMan September 9th, 2022
Thanks for reading. Do you want to leave a comment?
It will take a couple of minutes to show, please come back or refresh then.